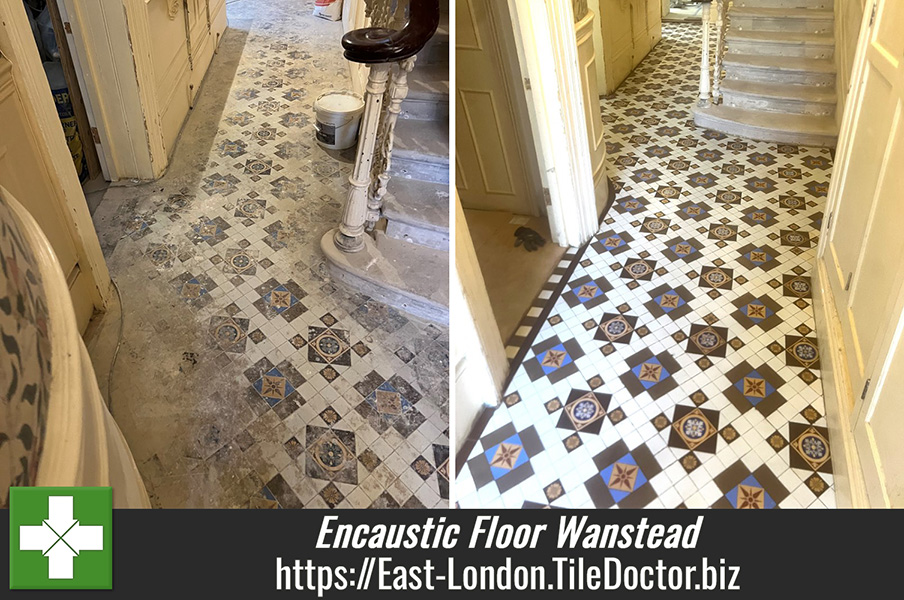
Neglected Victorian Encaustic Tiled Hallway Floor Restored in Wanstead
The photographs below are of an original Encaustic Tiled hallway floor at a Victorian period house in Wanstead. As you can see from the photos this floor had clearly suffered years of neglect. Originally it was covered with a carpet and more recently had vinyl tiles stuck to it. Multiple sections of the floor had damaged and loose pieces and one section next to the cupboard had a hole in it with all the tiles around it missing.

Having surveyed the floor, I came up with a restoration plan to repair the damaged areas and then restore the appearance of the tiles including applying a protective sealer. The quotation was accepted and a date set for the work to commence.

Cleaning and Repairing a Victorian Encaustic Tiled Hallway
First the sections of damaged substrate had to be rebuilt, so the original tiles had to be carefully removed so a new substrate could be installed and interlocked with the original to provide a structurally sound floor including the section with the hole.
Before this work started however, I went to great lengths to source the original salvaged encaustic tile pieces needed to make the floor whole again. It took a while to find some of the décor pieces as they are quite rare and in limited supply, but I found them. Once all the replacements had been sourced work started on the floor’s reconstruction the damaged and loose pieces were replaced and set in place with a modern adhesive.
After leaving the floor to set overnight work restarted the next day to clean the whole floor using 100 and 200-grit diamond pads which were worked into the tiles using water for lubrication. These pads do a great job of restoring the appearance of old encaustic tiles like these and will remove any patterns that have been ingrained into their surface from the previous floor coverings. The floor was rinsed after each pad had been applied and the soiling rinsed off with more water and then extracted with a wet vacuum.
After an inspection the now clean floor was given a final rinse and dried as much as possible with a wet vacuum.
Sealing a Victorian Encaustic Tiled Hallway
The floor was left to dry out and I returned later to apply Tile Doctor X-Tra Seal which is a protective sealer that improves the appearance of the tiles and prevents dirt from becoming ingrained in its pores. Tile Doctor X-Tra seal is an impregnating oil-based sealer that is fully breathable, an important consideration when dealing with old Victorian floors that don’t have a damp proof membrane.

The project took some time to complete but the result was transformational and my customer was very happy with the result. This old floor which is a valuable period feature has now been brought back to life and made good for another 100 years.

Before leaving I took time to mention the importance of using a pH neutral tile cleaner such as Tile Doctor Neutral Tile Cleaner for after care cleaning.
Professional Restoration of a Victorian Encaustic Tiled Hallway in East London
Neglected Victorian Encaustic Tiled Hallway Floor Restored in Wanstead Read More »