Hackney Tile Cleaning

Hackney Tile Cleaning

Welcome to my Work History archive where you will find examples of the cleaning and renovation of tiles carried out in Hackney.

Victorian Path Renovated in Hackney East London

Red and Black Victorian Tiled Pathway Restored in Hackney East London

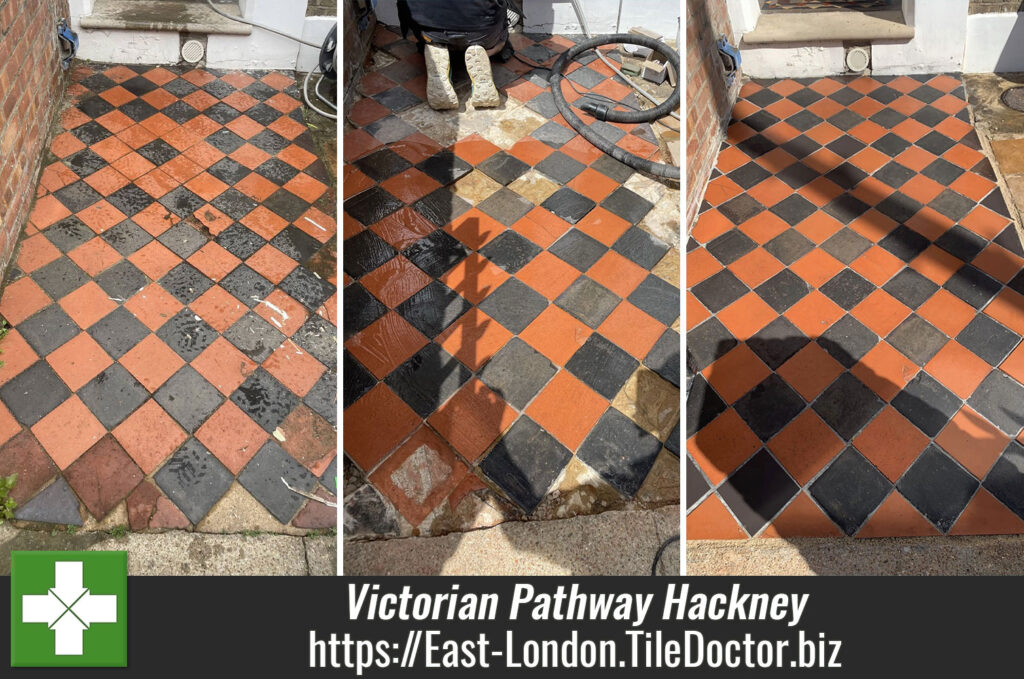
The picture below is of a Red and Black Victorian Path leading up to a house in Hackney; which according to my client had never been maintained since they moved in and that was 31 years ago.

The years had taken their toll on the tiles and the path had numerous problems including missing and damaged tiles, grout was missing or had fallen out, the colours in the tiles had faded, weeds were growing through and at some point in its long history a repair had been made which had messed up the pattern.

Victorian Pathway Before Restoration Hackney East London

It always makes a pleasant change to be asked to carry out work outside especially given then hot temperatures we have experienced in the Southeast recently; however, you do have pick the right weather window. I inspected the path and discussed with the client the process needed to renovate it. They were happy to go ahead with my quote and we arranged a time to return later in the month keeping one eye on the weather as a nice dry day would be needed.

Repairing a Black and Red Victorian Tiled Path

Being outdoors, for a change we didn’t need to tape any surrounding areas to protect them from the clean, so we were able to get straight on with repairing the path. This started by carefully lifting out the damaged tiles and the cement which had been used to backfill the places where tiles were missing. At this point I could see 15 tiles would need replacing in total.

I also dug out the channel between the adjacent Sandstone patio and the Victorian pathway so it could be tidied up. The foundation was cleaned up and I was ready to lay out the replacement tiles in a matching pattern to ensure a good fit and that they would be level with the surrounding tiles. I also sorted out the pattern making it an even, symmetrical design throughout the path.

Victorian Pathway During Restoration Hackney East London

Once I knew everything would fit, the tiles were all set in position used a slow setting adhesive that would allow for a few corrections as it went off. Before leaving for the day, I grout in the tiles using a smoke grey grout colour and left instructions for no one to walk on the path.

By the end of the first day the path was looking much healthier.

Deep Cleaning a Black and Red Victorian Tiled Path

The second day was all about cleaning and with the adhesive set I was able to give the whole path a mechanical scrub with a coarse 50-grit Diamond pad lubricated with a dilution of Tile Doctor Pro-Clean with is a strong alkaline cleaner. This combination really gets into the pores of the tile to lift out the ingrained with dirt. The soiled cleaning solution was the vacuumed away with a wet vax and the process repeated with a 100 and then a 200-grit diamond grit pad but with just water this time. The finer pads refine the finish of the tile after the application of the coarse 50-grit pad. After another rinse and extraction, the floor was inspected and worked on the really bad tiles using a set of diamond blocks to get right into the dirt.

Last step in the cleaning process was to give the tiles an acid rinse using a strong dilution of Tile Doctor Grout Clean-up which does a number of things including neutralising the ph level of the tile, countering any efflorescent salts in the floor and cleaning off grout smears.

My final step for the day was to fill in the channel between the Sandstone patio and the pathway with some an Easy Joint compound in a mushroom colour.

Sealing a Victorian Tiled Pathway

The dry weather continued so I was able to return the following day to seal the tiles and protect them from the weather. The tiles need to be dry before being sealed so their moisture readings were taken with a damp meter. The meter showed little to no moisture which was perfect. The weather helped massively in this process although it was a little too hot for me sometimes!

I used Tile Doctor X-Tra Seal to seal the floor, it’s an oil-based sealer that enhances colour and structure in the tile to bring out the Red and Black colour, its fully breathable and has built-in UV protection. Due to being outside and exposed to the sun this was clearly the best sealer for the job. I put 1 coat on, buffed off the excess and then left it for half an hour before putting another coat on.

Victorian Pathway After Restoration Hackney East London

The path looked new by the time I had finished, and I had a very happy customer who has now asked me to quote for a clean of their back garden patio.


Professional Restoration of a Victorian Tiled Pathway in East London

Red and Black Victorian Tiled Pathway Restored in Hackney East London Read More »

Travertine Patio Renovation Hackney E5

Renovating a Travertine Patio in Hackney

The picture shows an Travertine patio that was installed at a property in Hackney E5 around ten years ago and it had never been sealed. Over the year’s pollution and weather etc had taken its toll on the stone leaving the travertine stained with lichen, dull and grey as opposed to their original white/cream colour. Had the patio been sealed it would have provided some protection from the elements.

Travertine Patio Before Renovation Hackney E5

I conducted an initial visit where I tested several products to see what would be the most effective and establish what was required. Using that knowledge, I followed up with a written quote which was accepted, and a date arranged to complete the work.

We have adopted new working practices since the COVID-19 epidemic so we can work safely inside or outside but given the excellent weather this year this was an ideal and much easier to maintain social distancing.

Cleaning a Travertine Tiled Patio Floor

During day 1 on site I started by sweeping away loose stones and other debris you typically find on patios. Then Tile Doctor Patio and Brick Driveway cleaner was applied neat to the stone and left for two hours. This is a very strong product designed for use by professionals which cuts through the dirt and was ideal for this situation. There are certain precautions you do need to take when using it such as wearing PPE and you must keep it away from ponds etc.

Using water to lubricate, the solution was then scrubbed into the stone using a coarse 200-grit pad fitted to a rotary machine and followed up with a lot of rinsing and extracting with water and a wet vacuum.

To refine the surface after the coarse Travertine the 200-grit pad I followed with 400, 800 and then 1500-grit burnishing pads in sequence rinsing with water and extracting after each pad was applied. This process is known as burnishing and closes the pores in the stone giving it a polished appearance. By this point the Travertine looked way better and we were starting to get the smooth finish back.

Travertine Patio During Cleaning Hackney E5

The weather held so the following morning a 3000-grit polishing pad was applied dry to the stone using only a little water. This brings up the appearance of the stone even further and has the added advantage of leaving it dry and ready for sealing.

Sealing a Travertine Tiled Patio Floor

The client wanted a natural appearance so two coats of Tile Doctor Ultra Seal were applied to seal the stone. Ultra-Seal is an impregnating sealer that soaks into the stone, protecting it from within yet without changing the appearance of the stone leaving a completely natural look.

Travertine Patio During Sealing Hackney E5

The client very happy with job and now proud so show off her revamped patio. They hadn’t realised that the patio should have looked like this from the start. For aftercare I recommended they use Tile Doctor Stone Soap, many day to day cleaning products you find in supermarkets can strip off a sealer so if your using something else do check the label first.

Travertine Patio After Renovation Hackney E5


Professional Restoration of a Travertine Tiled Patio in East London

Renovating a Travertine Patio in Hackney Read More »

Balcony Tiled with Encaustic Cement Tiles in Hackney

Tiling a Balcony Floor in Hackney with Encaustic Cement tiles

This client from Hackney had started a DIY tiling job using modern Encaustic Cement tiles on an external balcony. The COVID-19 lockdown had just taken effect and it seemed like a great opportunity to get a few DIY projects done. Although it started off well, she began to struggle when having to cut the edging tiles and corners so was forced to leave the tiling incomplete and un-grouted. Furthermore, she had attempted to seal the tiles, but this had somehow caused the tiles to go milky white. Encaustic tiles date back to medieval times and have been popular in the UK since the nineteenth century and have become extremely popular here in the last few years.

Encaustic Cement Balcony Tiling Project in Hackney Before

Concerned the whole project would need ripping up and starting again she contact Tile Doctor and I arranged a visit to the property to assess the tiling and see if the project it could be rescued. Since the COVID-19 epidemic began we have adopted new working practices such as more PPE and Social Distancing to allow us to continue working.

Encaustic Cement Balcony Tiling Project in Hackney Before

We test cleaned the sealer and found the application of a 400-grit diamond pad was the best way to clean off the sealer and renovate the tile. Additionally, we had been asked to complete the tiling project which was approx. 24m2. The job would therefore entail tiling, cleaning, and sealing so it took a little while to calculate the quote which was accepted.

Cleaning/Repairing an Encaustic Cement Tiled Balcony

There was a lot of work to do and so I teamed up with fellow Tile Doctor Andrew Newstead for this job working as a two-man team. It took three days to complete the tiling and the grouting, then we returned the following week to allow the adhesive and grout to fully dry over the weekend.

The next step was to clean the area the customer had previously laid and sealed to remove the old sealer that had damaged the colour and look of the tiles. For this we used water and a series of 400, 800 and 1500-grit diamond pads. This gradually removed the sealer and brought the tiles back to a more natural finish. We suspect the reason her tiles went milky was she hadn’t buffed off the excess sealer but luckily, we were able to fix it.

Sealing an Encaustic Cement Tiled Balcony

We then returned for one more morning, buffed tiles with a 3000-grit pad to further enhance their appearance and then seal with two coats of Tile Doctor Colour Grow. Colour Grow is an impregnating sealer that improves colour and works by soaking into the pores of the tile preventing dirt from becoming ingrained there.

Encaustic Cement Balcony Tiling Project in Hackney After Encaustic Cement Balcony Tiling Project in Hackney After

I’m pleased to say the whole job went smoothly and our client was pleased (see feedback below) that they could finally use their balcony which I’m sure has been in constant use since.

Plenty of problems to solve with my half-finished roof terrace, which were solved cheerfully and carefully. By Gemma M, Hackney, 27 May 2020


Encaustic Cement Balcony Tiling Project Finished in East London

Tiling a Balcony Floor in Hackney with Encaustic Cement tiles Read More »

=================================

East London Tile Doctor

================================= Read More »

Scroll to Top